How to create your own Comic Chat Character - Part 5Brought to you by The Phoenix On-Line Foundation and Bob - AKA Bud O
A few years back, someone coined the expression: "Body Language". It was a
study of the various poses people assume while talking, ( or just thinking ). The original
Comic Chat Characters, created by cartoonist Jim Woodring, have a lot of movement, which really
makes the characters come alive in the program. Some of these movements are subtle, yet enough
to express the desired emotion. The double take, bored, angry, laugh, etc, all have poses to
match the emotion. Rebecca has 35 poses, Susan has 43 poses. (and you thought 15 was a lot of
effort) Yet there are only about 12 facial expressions, repeated for the various poses. If you open the Susan.avs in the editor, highlight the Neutral 1 pose, then
press and hold the down arrow key on your keyboard, you will see an animation similar to cartoon
flip books. In particular notice the arm and hand movements. This can also be a good test of
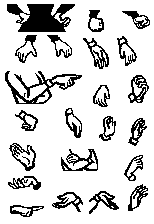
your characters' body language. Which brings us to the subject for this lesson: Body Language, particularly
the use of hands. Here is a black and white bitmap (.bmp format) with various clips of hands
that you can copy and paste to your creation. This composite was made by exporting poses from
Susan, Anna and Rebecca, reducing to 2 color, then selecting and pasting the hands only. If
the hand you need isn't in the set, you can modify one that is close. All paint programs,
including the Editor, have a flip image or mirror image feature to reverse the hand as needed.
If you are creating a male character, you can export poses from Tongtyed, Lance, or Kevin.
This is very easy to do, so there is no need to settle for just blobs for hands with all this
detail readily available. In case you're not familiar with the Export feature of the Editor, let's
review that briefly. Open the character avs file, select the pose you wish to export. You don't
have to use the selection rectangle, simply have the pose in the window. Click file, export,
and a dialog box opens letting you choose a filename and destination. Leave the extension as
.bmp and save. Open the saved image in your paint program and you will see a 154 X 224, 24 bit
copy of the pose. Select colors, channel splitting, split to RGB. One of the three channels
will have the hand color removed, close the other two without saving. With the remaining
channel highlighted, select colors, reduce colors, and choose 1 bit 2 color. Now you can
select, copy, paste, flip, or rotate the selection for use in your character. ( be sure to have
the thumb facing correctly, characters really look odd with 2 left hands) One nice feature of modern paint programs is the ability to paste
transparently. To use this effectively, we need to understand the concept of background color
and foreground color. If you are drawing on white paper with a black pen, then obviously the
background is white, the foreground is black. However, if you draw a solid black circle, then
draw a smaller red circle on the black, then the background color (relative to the red circle)
is black, the foreground is red. In Paint Shop Pro, there are two color boxes shown at all
times with an angled double arrow between them. By clicking the arrow, you can reverse the
background and foreground colors. To paste transparently, the background color of the part
you wish to copy has to be in the background position of the two boxes. First select the
image background color (should be white if you've been following my lessons) with the dropper
tool. Then click the arrow to move the color to the background position. Now use either the
rectangle or freehand selection tool to select the part. Click copy, then paste transparent.
You will see the selected part floating with the selection marquee precisely around the part
only. Click once to temporarily "park" the selection anywhere on the image (the marquee should
still be visible) , practice with the flip, mirror and rotate tools to get the effect you want,
then position the part and paste by right clicking. By the way, if you don't have the original
MS character avs files, you can get them at:
Many character creators are having problems because they are trying to edit in full color. They are either scanning full color pictures, or taking color pictures from the web, and are not reducing the images to 2 color as I have suggested in these lessons. True cartooning begins in basic black and white. If you only want to copy someone else's work, then I suppose that is an easy shortcut. But to be truly creative, even with a "borrowed" template, you need to make your basic poses in 1 bit. If you need templates for the eyes, mouth, etc, just read this lesson again, replacing the word "hands" with "eyes"...get the idea? This concludes the character tutorials. For advanced lessons, visit the Academy of Comic Chat Artists, accessible from the home page.
|