How to create your own Comic Chat Character - Part 4Brought to you by The Phoenix On-Line Foundation and Bob - AKA Bud O
For a little change of pace, I thought we might go over some "resources" for
Chat Characters. Every "author" must tailor his/her ideas, sources, and character types based
on individual abilities, and to a large part, the software used. The problem with most character resources, as mentioned earlier, are the
copyrights. If you scan a picture from a magazine to make a character, and do not obtain written
permission to use the image, then you have violated the Copyright laws. We are seeing many
copyrighted images show up as characters. Even if you don't claim any copyright, you have
still broken the law, and there can be serious penalties for that. When you draw a character
from "scratch", you can still violate copyright law if the image represents an actual copyright
image to a certain degree. If you need assistance or inspiration in the "art" department, the best
resource is a clip art library or collection, which can be purchased at low cost. I have found
the Clickart collections, by T-Maker ( a subsidiary of Broderbund ) the best clip art
collections available. They have sets ranging from 5,000 clips to as high as 500,000 clips,
with prices ranging from 39 to 99 dollars. Broderbund Software, by the way, is the publisher
of perhaps the world's most popular home graphics program "Print Shop". Don't confuse that
with "Paint Shop" which is published by JASC. I have dozens of clip-art collections, and since
I purchased them, I am free to use them, modify them, and even copyright my new "creations",
the only thing I am not allowed to do is to re-assemble the images into new collections, selling
them as my own collection. So, this time we will take an image from one of my collections, and show
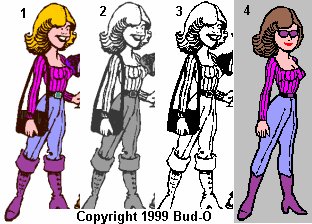
you how to transform it into a usable character image. Here is an image showing the transition from the original clip,
which happened to be in Windows Metafile (.wmf) format. Metafile is a popular format, since it is a "quasi-vector" image, that can be
resized (in a drawing program), and still retain sharp lines. Importing the image into a paint
program such as Paint Shop Pro, the image converts to a "Bitmap" format, with the usual "pixely"
look. Frame 1 shows the original image, in .wmf format, opened in Paint Shop Pro
and then saved as a .bmp file. The original image was 147 pixels wide by 422 pixels tall, too
large for direct use. (Note that I resized number 1 to fit this smaller image, in practice
do not resize until all color has been removed). Now here are the actual steps:
Open the image in Paint Shop Pro, magnify to at least 1x (actual size).
On the menu, select "colors", "channel splitting", "split to RGB". Now you will have 3 new
images on the screen, showing the 3 color channels used (Red, Green, Blue) Delete the "green"
and "blue" as they have large black areas unsuitable for use. Notice the "red" has most of
the color removed, with only a little grayscale remaining (Frame 2) With the "red" image
highlighted, choose "colors", "reduce colors", and choose 1 bit (2 color) Sound familiar?
We now have a nice black and white, uncluttered and undithered image we can edit.
Save the "red" image as Katy1.bmp (When channel splitting, you have to experiment a bit,
depending on the colors in the original image. Use the color channel that works the best for
your image.)
Now we have to reduce the size of our image to fit the Character Editor.
Remember that size is 154 pixels wide by 224 pixels tall. There are 4 methods available for
re-sizing: "Smart Size" and "Pixel Resize", which are used on images with color depths less
than 16 million; also "Bilinear Resample" and "Bicubic Resample", which can only be used on
24 bit images. So let's start again:
Open the Katy1.bmp. Choose "Colors" "increase colors",,,set to 24 bit
16 million (no, the "colors" won't come back) Click the resize button, set the image height
to 224, be sure "maintain aspect ratio" is checked, select Bicubic Resample at the bottom,
and click ok. Now the image is the correct height, so open a new blank image 154 x 224 in
16 million colors, with white background. Highlight the resized image, hit Ctrl A to select
ALL, then click the "copy" button. Highlight the blank image and click the "paste button",
center the pasted image. Save the new 154 x 224 image as Katy2.bmp With Katy2.bmp still
highlighted, choose "colors", reduce colors,,set to 1 bit 2 color again., and save.. (Frame 3)
Edit the image, make copies, rotate, whatever you want to do at this point, you are on your
own. When you are ready for color, change the image(s) back to 24 bit. (Frame 4)
|