How to create your own Comic Chat Character - Part 2Brought to you by The Phoenix On-Line Foundation and Bob - AKA Bud O
Before we start, here's a tip for you "quick change artists" you won't find
in the help files. When you want to change characters in Comic Chat, simply double-click on
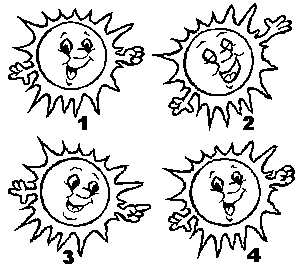
your present character image (above the emotion wheel), and the character list will open. Here is a gif showing 4 poses for "Sunny". You saw the number 1 pose last time in full color, which would serve as
a "neutral1". By rotating this image "left" about 25 degrees (number 2) , and making a few
changes, we now have a new pose for "laugh1". In number 3, the image has been rotated "right" ,
the index finger extended and a little change in the mouth and we have a "point to others".
In number 4, image was rotated "left", and with no other changes, we have a "neutral2". By
using a true black and white ( 1 bit) image, the rotation only scatters a few pixels which are
easily touched up. The nice thing about this approach is that you only have to work with two
colors (black and white). By making a few minor changes, you can see that creating 15 different
poses is quick and "painless". If you are drawing and tracing your images for scanning, then
simply rotate the tracing paper for different "body" parts to achieve the rotation. Since these images are true monochrome ( 1 bit ), you cannot add color
to them. First, the images must be converted to either 256 color or 16 million color. Since
"Sunny" only requires a few colors, setting to 256 is adequate. If you want to add tints that
are beyond the 256 color specification (such as a flesh tint), then you must change to 16
million colors. Later on, we will learn more about colors, and how they affect the final file
size of the AVB. You should know right now, however, that scanned pictures or photos usually
create AVBs with large file size, not because of the number of colors used, but rather due to
the intricate manner they are arranged and blended. The editor cannot "summarize" these blends
and the file size goes up. Your final AVB should be under 200kb, preferably under 100kb. For
now, work with the black and white images until all the poses and emotions are done. In Lesson 1, I mentioned that about 15 poses are required for a really
complete character. I find it easier to name the poses consistently, it helps arrange my
"gallery". What are the poses?. If you look at the emotion wheel, starting clockwise from
the top you have Shout, Laugh, Happy, Coy, Bored, Scared, Sad, and Angry, a total of 8.
Now add to thatPoint Other, Point Self, Wave, and at least 4 neutrals, and you have 15.
Why 4 neutrals?. Watch someone as they talk to you, they don't just maintain one emotion.
So to make your character "interesting", it should change a little with each message sent.
The neutrals cycle in sequence. The primary emotions will be named Shout1, Laugh1, Happy1,
etc. When you add the pose in the editor, set the emotion slider to correspond to the labeled
emotion. That makes the emotion show up in the expected place on the wheel. The editor won't
allow you to duplicate intensities. If you want people to use your character, make it easy
and fun to find the emotions. It's also important to know which poses will be sent automatically
with your message. For example, when you type LOL, the emotion Laugh1 is sent. When you type
"bye" or "hi" or "howdy" then the Wave emotion is sent. For a complete list of all the
text/pose/emotion assignments refer to the Comic Chat help file. In theory, you could have 10 intensities for each emotion on the emotion
wheel (according to the help file), but you should limit the intensities to one, two, or three
at the most for each emotion. If you have 3, then they should be set to, for example, Bored1,
Bored4, Bored7. If you space them closer together, or get too close to the "10" (at the center)
you won't be able to find them on the wheel. In fact, many of them will "drop out" when you
create the character to an AVB file. By the way, the original version of Editor had the
strongest emotion (outside of the wheel) as "10". But the help file was in error and said
that the strongest was "1". When the current version was released, the programmers found it
easier to change the actual program than to simply change the help file. So you will find
the "Bored1", at the outside of the wheel, with higher numbers (and "weaker" intensities)
toward the center. Don't try to figure it out, just set your primary intensity to "1". Microsoft released all the AVS files for the original characters supplied
with Comic Chat. They were supplied as a "help" for authors, unfortunately we ended up with
10 color versions of Xeno, and countless Hughs. However, if you have these AVS, you can export
each pose to a file (.bmp format) , then copy and paste some of the "parts" such as eyes,
hands, etc. for your character. That wraps up this lesson, next time we will get into our paint programs
and start working with colors, and how to copy, paste, mirror, and flip images and "parts" to
speed things along. My instructions will be for Paint Shop Pro, you will have to find the
similar commands in your favorite paint program. The "rule" for today: Don't be afraid to experiment and do be creative
and original. We hope people will "laugh" at your work, for after all, that is the purpose of
the character.
| Lesson 1 | Lesson 3 | Home | Email us at:phoenix_org@yahoo.com |