 |
|  |
|
by Professor Bud-O
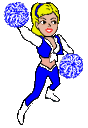
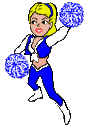
Most people say they don't create their own original characters because they don't know how
to draw. By using the powerful tools in Paint Shop, you will be amazed at what you can
create with very little freehand drawing.
The following instructions apply to Paint Shop Pro
from JASC SOFTWARE . The program is gaining
popularity among serious professionals due to its many features and short learning curve.
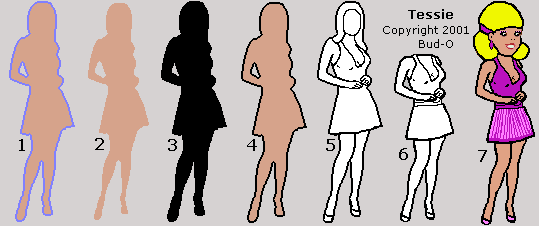
Double click the thumbnail to open the image. The image must be set to 24 bit (16 million colors). If not, click Colors, Increase Color Depth, 24 bit. Resize the subject about 210 to 215 pixels high using Bilinear Resample, check the aspect ratio box. Don't worry if the image blurs. Open a new image, 24 bit, 154 pixels wide by 224 pixels high, white background. Select and copy the subject, paste as new selection to the new image. (Don't deselect yet) There should be 2 or 3 pixels of space at the top and bottom of the subject. If not, click UNDO once, then open the original again, adjust resize numbers accordingly, and paste to the new image. When it looks about right, save the new image as Image1.bmp. (Be sure to drop down the file type window and select Windows Bitmap.) Color photos processed in a paint program normally have about a 2 pixel wide dithered area around the subject (shown here in blue). If your photo already has a white background you're ready for the fun stuff. If not then you must remove the background clutter with the eraser tool, background color set to white. Be very careful to remove only the background, leaving the dithered border intact. Using high magnification will help for this step. TIP: If you have a digital camera, hang up a white sheet and take pics of a friend, or use the self timer and shoot a bunch of poses to match the emotion wheel. Use floods for side and back fills and no flash to prevent unwanted shadows around the subject or shading in the backdrop. If you don't know all the poses required, read the editor help file or the FAQ on this site.
Using the magic wand tool, hold down the shift key and select all the white background areas. If you see some small scattered halos in the background area, that means you have stray pixels that are not perfectly white, and they must be removed. You can use the rectangle or lasso selection tool to select a stray then click the Cut button. You may have to select with halo tool several times to see and remove all the strays. After removing the strays, select all the white with magic wand tool, click Selections, Invert. Click Selections, Modify, Contract, 2 pixels. Click Copy. Open a new image same size and Paste selection. Save As Image 2.bmp. Open Image1.bmp, select white background areas with magic wand. Click Selections, Invert. Click Image, Effects, Cutout. Set the cutout screen as follows...Fill interior with black, Opacity 100, Blur 0, Horizontal and Vertical Offset 0. Click OK. Save As Image3.bmp. Open Image2.bmp and select white background areas with the magic wand. Click Selections, Invert. Copy to clipboard. Open Image3.bmp and Paste, being careful to center subject with a 2 pixel border around it. Save As Image4.bmp. With Image4.bmp open click Colors, Channel Splitting, Split RGB. Three new images will appear. Normally you can close without saving the blue and green, save the red as Image5.bmp. At this point you can fill in some missing detail lines such as the clothing, arms, hands, shoes, etc by carefully tracing over the subject with black. Then save. With Image5.bmp open, click Colors, Adjust, Brightness, adjust to about +40, until most of the gray is gone. Click OK. Click Colors, Decrease Color Depth, 1 bit, Save. Do not attempt the next step with an image higher than true monochromatic black and white or you will have a huge mess. Depending on the size of the head used, the 1 bit image needs to be reduced. The body should be about 165 pixels from toe to shoulder. Resize accordingly using Smart Size, click CtrlA, click Copy, open a new image 154 X 224, paste and Save As Image6.bmp A few wild pixels will show up which can be easily fixed. For drawing the head and adding other features, keep image at 1 bit. As you work through your poses, keep them all at 1 bit until finished. It's much easier to resize, rotate, copy and paste with monochromatic as you aren't constantly fighting the dithering and blurring. All this seems complicated, but the entire process from Image1 to Image6 only takes about 10 minutes once you get the hang of it. Several steps listed may be redundant, but repetition will help you learn. As you progress, you will see shortcuts such as keeping more images open at one time. When you are ready to add color, increase the color depth back to 24 bit. Forget all the dithering, shading, smoothing, smudging or other blending in the final poses, that just makes the file size bigger. There should be no more than 16 colors in the final pose. To check this click Colors, Count Colors. If there are 17 or more colors, then click Colors, Decrease Color Depth, 16 colors (4 bit), Optimized Octree, Nearest Color. This will force the colors to the standard 16 palette. Then increase the color depth back to 24 bit so you can make special colors such as flesh tones. Once all the poses are finished, download SAMPLE AVS FILE . After extracting sample.avs from the ZIP file, open it into the MS Chat Character Editor, then 'save as' newname.avs and import your 24 bit poses. Set the head targets, add the character icon, and fill out the properties section. When making the avb, set to high color. The colors stay sharp and the file sizes are small. If the avb file size exceeds 100kb, you're using too many colors or a lot of shading and dithering. The clothing, colors, face, hair style, etc should be consistent especially among the neutrals and standard emoticon poses such as Laugh1, wave, point other and point self. After all, if you are speaking to someone in person, they aren't constantly changing colors or costumes. Save the special, surprise stuff for the send emotion feature of the emotion wheel. If your pose colors are all different, the file size will grow, and the character will be confusing to others. Don't try to cram all your ideas into one huge character, better to make several. For more info on sequencing poses refer to the FAQ on this site. To help you follow this guide while working, copy and paste this page to a .txt file and print it out.
|
